As stated earlier I use a combination of technologies to run this blog.
This blog is created with hugo (a static site generator) and uses the papermod theme. Additional technologies that are used:
- GitLab as git remote
- GitLab CI to build container images (development and production)
- Docker to run the images (development on my home server and production on a machine on the public internet)
- Watchtower to check for new images every ~5 minutes
- Caddy to handle TLS certificates (only for production)
- A VM on Hetzner Cloud used as a host for multiple containers
GitLab
At first the development and production hosts need access to the container registry. Therefore:
- Create a new
deploy_tokenofficial docs
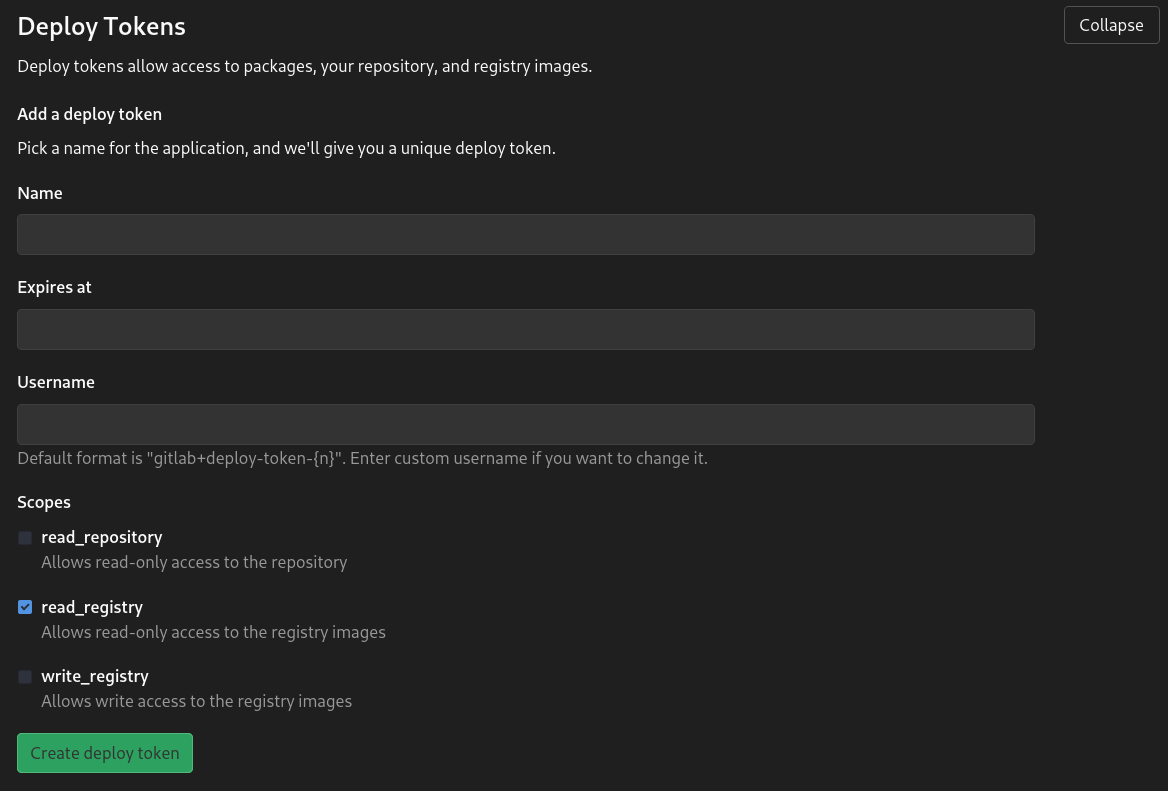
- Login on both the development/production docker host using the created user and password.
docker login <your.gitlab.instance:4567>CI
Here are a few things to mention.
The variable GIT_SUBMODULE_STRATEGY: recursive is needed as hugo themes are added as git submodules. Therefore all themes must be cloned before the static page can be build.
I use two stages to build containers for production and development with a single CI run. The build-containers-production stage will only be executed if the $CI_COMMIT_BRANCH equals main as only code/articles on this branch are ready to be published.
The second stage build-container-dev is used for a development deployment on my home server. This stage will be executed on every branch, so I can always check if the article I am currently working on looks good. All of this could be achieved by using hugo server -D on my local machine, but this is not as much fun as playing around with GitLab CI, Docker and my home server (which will be covered in another post in the near future).
The script part in both stages are more or less the same. For production the created image will be tagged with production and for development with dev.
An important change is cd myblog && sed -i 's|https://sterba.dev|http://192.168.0.2:9337|g' config.yaml && cd ... Without changing the baseURL all links in the dev image will direct to https://sterba.dev/....
Please mind that this will not work if you are using hugo drafts. Drafts will not be rendered with this build script. This is no problem for my workflow as only finished posts are on the main branch.
variables:
  GIT_SUBMODULE_STRATEGY: recursive

stages:
  - build-containers-production
  - build-container-dev

before_script:
  - docker info

build_image_production:
  stage: build-containers-production
  rules:
    - if: '$CI_COMMIT_BRANCH == "main"'
      when: always
    - when: never

  script:
    - docker login -u $CI_REGISTRY_USER -p $CI_REGISTRY_PASSWORD $CI_REGISTRY
    - docker build -t your.gitlab.com:4567/andre/blog:production -f docker/Dockerfile .
    - docker push your.gitlab.com:4567/andre/blog:production

build_image_test:
  stage: build-container-dev

  script:
    - sed -i 's|https://sterba.dev|http://192.168.0.2:9337|g' myblog/config.yaml
    - docker login -u $CI_REGISTRY_USER -p $CI_REGISTRY_PASSWORD $CI_REGISTRY
    - docker build -t your.gitlab.com:4567/andre/blog:dev -f docker/Dockerfile .
    - docker push your.gitlab.com:4567/andre/blog:dev
Docker
The blog container is a multistage build because I only want the generated static content in my webserver container (nginx). Therefore the first container (based on debian:buster-slim) installs the current version of hugo, copies the blog in an app directory and generates the static content.
The second container is a basic nginx with a simple configuration which will be displayed later. With COPY --from=build /app/public/ /opt/public/ the previously generated content is copied into the configured webserver root directory of nginx.
Always update the packages in your base images (in this case debian)!
Because the base images are not rebuild every few days they do not contain the newest version of a specific package. So you could go to production with vulnerable or old packages.
FROM debian:buster-slim AS build

ENV HUGO_VERSION=0.80.0
ADD https://github.com/gohugoio/hugo/releases/download/v${HUGO_VERSION}/hugo_extended_${HUGO_VERSION}_Linux-64bit.tar.gz /tmp/
RUN tar -xf /tmp/hugo_extended_${HUGO_VERSION}_Linux-64bit.tar.gz -C /usr/bin/

COPY ./myblog /app

RUN hugo --source=/app/

FROM nginx:stable AS nginx
ENV TZ=Etc/UTC

RUN  export DEBIAN_FRONTEND=noninteractive \
    && apt-get update \
    && apt-get dist-upgrade -y --no-install-recommends

COPY docker/nginx/blog /etc/nginx/sites-available/blog
COPY docker/nginx/nginx.conf /etc/nginx/nginx.conf

RUN mkdir /etc/nginx/sites-enabled/ \
    && ln -s /etc/nginx/sites-available/blog /etc/nginx/sites-enabled/blog \
    && rm /etc/nginx/conf.d/default.conf

COPY --from=build \
    /app/public/ /opt/public/

EXPOSE 9337
The nginx site configuration is pretty simple. The root is the /opt/public folder we used earlier to copy our build artifacts to. As hugo and papermod generate a custom 404 page all 404's should be directed to the generated page instead of the default nginx page.
server {
        listen 9337;
        root /opt/public/;
        index index.html;
        error_page    404    /404.html;
        location / {
                try_files $uri $uri/ =404;
        }
}
The main configuration of nginx is also pretty straight forward. It simply loads the previously created site configuration. I disabled any logging as I don't care about logs because I don't want any information about my readers (yes, I actually care about your privacy!).
events {}

http {
    server_tokens off;
    sendfile on;
    keepalive_timeout 65;
    tcp_nodelay on;
    include /etc/nginx/mime.types;

    access_log off;
    error_log /dev/null;

    include /etc/nginx/conf.d/*.conf;
    include /etc/nginx/sites-enabled/*;
}
Deployment
The deployment process contains two different components. First there is docker-compose which handles the container build previously. Additionally, there is a caddy server which acts as reverse proxy (only used for production).
Docker Compose
Although there are two deployment environments their configuration is the same.
Only the used tag is different. There is not only the image of the blog we build earlier, but also a watchtower container. Watchtower can be used to monitor the upstream registry for a new image. So after every CI run for development watchtower will pull the new image, shutdown the running container and restart it with the new image.
But there are other containers running on the host and by default watchtower will try to update all containers currently running on a host. A fix is to provide the --label-enable command flag. With this flag only containers with the label com.centurylinklabs.watchtower.enable set to true will be updated by watchtower.
Replace the port configuration 10.13.37.1 with the ip of your machine or use 0.0.0.0 to bind to any address.
version: "3"
services:
    andre-blog:
        image: your.gitlab.com/andre/blog:<production or dev>
        container_name: andre-blog
        restart: always
        labels:
          - "com.centurylinklabs.watchtower.enable=true"
        ports:
            - 192.168.0.2:9337:9337
    watchtower:
      image: containrrr/watchtower
      command: --label-enable --interval 30
      volumes:
        - /var/run/docker.sock:/var/run/docker.sock
        - ~/.docker/config.json:/config.json
Caddy
I mostly rely on Caddy as web server because it has an easy configuration and provides TLS certificates with Let's Encrypt out of the box.
There are two sub-settings in the main config:
The configuration for the reverse-proxy module which simply forwards all traffic to the container created above.
Some additional headers.
sterba.dev {
  reverse_proxy http://localhost:9337 {
  }
  header {
    Strict-Transport-Security max-age=31536000;
    Referrer-Policy no-referrer-when-downgrade
  }
}
Conclusion
As you can see the setup is pretty straight forward and requires not that much configuration. With this setup I have a complete CI/CD stack to build, test (in a development environment) and deploy the blog. The release process of a finished post is no work at all. I simply need to push a post to the main branch and everything else will be handled by the components presented in this post.